 |
 |
 |
 |
 |
 |
 |
 |
 |
 |
 |
 |
 |
 |
 |
 |
 |
 |
 |
 |
 |
 |
 |
 |
 |
 |
 |
 |
 |
 |
 |
 |
 |
 |
 |
 |
 |
 |
 |
 |
 |
 |
 |
 |
 |
 |
 |
 |
 |
 |
 |
 |
 |
 |
 |
 |
 |
 |
 |
 |
 |
 |
 |
 |
 |
 |
 |
 |
 |
 |
 |
 |
 |
 |
 |
 |
 |
 |
 |
 |
|
|
 |
|
|
|
 |
|
 |
|
 |
|
 |
|
 |
|
 |
|
|
|
Crunchy Text
basic Knowledge required |
|
|
|
 |
|
|
|
Make a new image,
Width: 300 pixels
Height: 200 pixels
Mode: RGB Color
Contents: White |
|
|
|
|
|
 |
|
|
|
Create a new channel, the new channel will automatically named "Alpha 1".
type in some words like below: |
|
|
|
|
|
 |
|
|
|
 |
|
|
|
Go back to the channels and click on [ Save Selection as Channel ]: |
|
|
|
|
|
 |
|
|
|
|
|
 |
|
|
|
While the Alpha 1 channel is active, go to Filter>Distort>Ocean Ripple, use these settings: Ripple Size: 1
Ripple Magnitude: 12
Then go to Filter>Blur>Gaussian Blur, use 5 pixels for Radius. |
|
|
|
|
|
 |
|
|
|
Create a new channel called "Alpha 3"
Then go to Filter>Pixelate>Mezzoint, then select Coarse dots, click ok. |
|
|
|
|
|
 |
|
|
|
 |
|
|
|
Go back to "Alpha 1" channel: |
|
|
|
|
 |
|
|
|
 |
|
|
|
Go to Select>Load Selection, then select the "Alpha 3" channel. |
|
|
|
|
|
 |
|
|
|
 |
|
|
|
Go to Image>Adjust>Brightness/Contrast, set the Brightness to -40 and contrast 0.
Then Select>Deselect. |
|
|
 |
|
|
|
|
|
|
 |
|
|
|
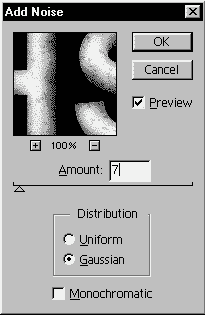
Go to Select>Load Selection, this time use the Alpha 2 channel.
Then go to Filter>Noise>Add Noise: |
|
|
|
|
|
 |
|
|
|
 |
|
|
|
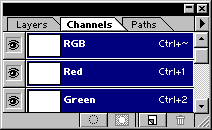
Go back to the RGB channels. |
|
|
|
|
|
 |
|
|
|
|
|
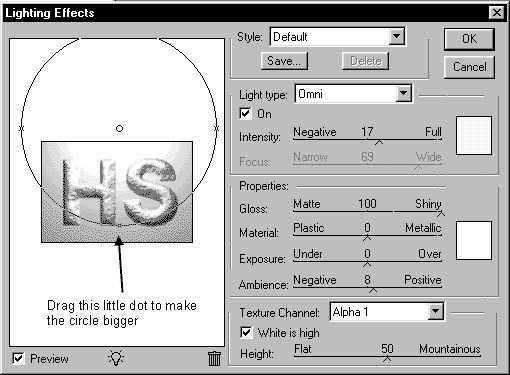
Then go to Filter>Render>Lighting Effects: |
|
|
|
 |
|
|
|
Click OK and your image should look like this: |
|
|
|
 |
|
|
|
 |
|
|
|
Go to Filter>Noise>Add Noise, set the amount to 20, click Gaussian.
While the selection is still active, create a new layer.
go to Edit>Copy Merge, then Edit>Paste:
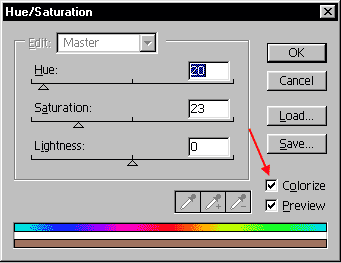
then press Ctrl+U or go to Image>Adjust>Hue/Saturation: |
|
|
|
|
|
 |
|
|
|
Simply play with the settings there to change the color. |
|
|
|
|
|
 |
|
|
|
 |
|
|
|
|
|
|
|
|
|


